
거의 알고리즘 일기장
html canvas + ts로 눈효과 만들기(canvas animation - 1편) 본문
예전에 재밌게 했던 html canvas와 바닐라 js 를 이용해 효과들을 만든 기억이 떠올라 다시 만들어보았다.
워밍업으로 간단한 눈효과를 만들어보았다.
처음 막상 하려고 하면 어떻게 하지 막막할수도 있지만, 구현사항은 간단하다!
눈 class를 만든다. 눈 클래스에서 협력할 기능은 다음과 같다.
1. requestAnimationFrame function에 실행할 draw function을 만든다.(눈그림을 그릴) (draw)
2.resize시에 동작할 function을 만든다. (resize가 되면 stageWidth, stageHeight가 바뀜으로) (init)
내부 function은 다음과 같다.
1. 그리기 전에 위치를 업데이트 해주어야 눈이 내리는것처럼 될것이다. 그러므로 위치 update function을 만든다. (update)
2. 눈에서 보이지 않는 위치나 opacity가 0이 되었는지 확인하는 function을 만든다. (isDead)
데모

세팅
vite, ts, pure css 사용
자세한 내용은 아래 링크 참고
https://github.com/Kwonkunkun/portfolio-webapp-vanillajs
GitHub - Kwonkunkun/portfolio-webapp-vanillajs: 포트폴리오 프로젝트
포트폴리오 프로젝트. Contribute to Kwonkunkun/portfolio-webapp-vanillajs development by creating an account on GitHub.
github.com
구조
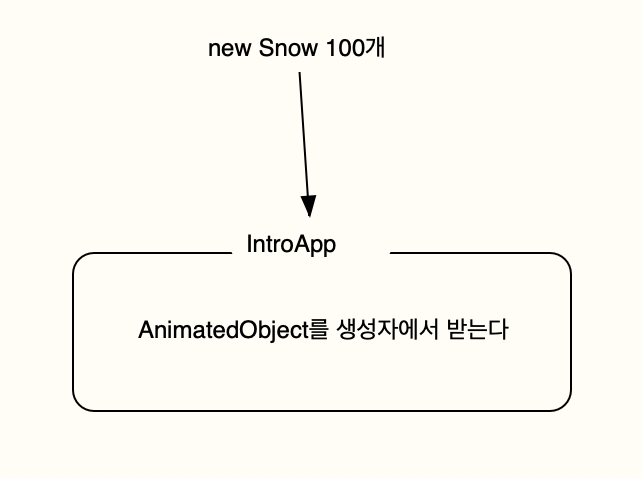
AnimatedObject라는 interface를
Particle이라는 interface에서 extend하고
Snow class로 Particle interface를 implement했다.

그리고 IntroApp class에서 AnimatedObject interface를 extend한 Particle interface를 구현한 Snow class를 만들어 주입한다.
전체 코드
utils
/**
 * @description 두 값 사이의 랜덤값을 반환
 */
export const getRandomArbitrary = (min: number, max: number) => {
  return Math.random() * (max - min) + min;
};
interface
/**
 * @description animated object interface
 */
export interface AnimatedObject {
  init(stageWidth: number, stageHeight: number): void;
  update(): void;
  draw(ctx: CanvasRenderingContext2D): void;
}

/**
 * @description particle interface
 */
export interface Particle extends AnimatedObject {
  x: number;
  y: number;
  radius: number;
  speedX: number;
  speedY: number;
  stageWidth: number;
  stageHeight: number;
}
snow
import { getRandomArbitrary } from '@/utils';
import { Particle } from '@/src/intro/particles/particles.interface';

/**
 * @description 눈 class
 */
export class Snow implements Particle {
  x!: number;
  y!: number;
  radius!: number;
  speedX!: number;
  speedY!: number;
  opacity!: number;
  opacityMinus!: number;
  pixelRatio!: number;
  stageWidth!: number;
  stageHeight!: number;

  constructor(stageWidth: number, stageHeight: number) {
    this.init(stageWidth, stageHeight);
  }

  init(stageWidth: number, stageHeight: number): void {
    this.x = getRandomArbitrary(0, stageWidth);
    this.y = getRandomArbitrary(0, stageHeight / 10);
    this.radius = getRandomArbitrary(5, 10);
    this.speedX = getRandomArbitrary(-1, 1);
    this.speedY = getRandomArbitrary(1, 5);
    this.opacity = getRandomArbitrary(0.8, 1);
    this.opacityMinus = getRandomArbitrary(0.001, 0.005);
    this.pixelRatio = window.devicePixelRatio > 1 ? 2 : 1;
    this.stageWidth = stageWidth;
    this.stageHeight = stageHeight;
  }

  update(): void {
    this.x += this.speedX;
    this.y += this.speedY;
    this.opacity -= this.opacityMinus;
  }

  draw(ctx: CanvasRenderingContext2D): void {
    //눈이 화면 밖으로 나가던가 opacity 가 0 이하면 다시 init 해줘야함
    if (this.isDead()) {
      //ratio 에 따라 다르게 넣어주었기 때문에.. 이렇게 해야함
      this.init(
        ctx.canvas.width / this.pixelRatio,
        ctx.canvas.height / this.pixelRatio,
      );
    }

    this.update();
    ctx.beginPath();
    ctx.arc(this.x, this.y, this.radius, 0, 2 * Math.PI);
    ctx.fillStyle = `rgba(255, 255, 255, ${this.opacity})`;
    ctx.fill();
    ctx.closePath();
  }

  //보이지 않거나 시야에서 벗어나면 true
  isDead(): boolean {
    return (
      this.x < 0 ||
      this.x > this.stageWidth ||
      this.y < 0 ||
      this.y > this.stageHeight ||
      this.opacity <= 0
    );
  }
}
introApp class
import '@/styles/globals.css';
import '@/styles/intro.css';
import { Snow } from '@/src/intro/particles/Snow';
import { Meteor } from '@/src/intro/particles/Meteor';
import { AnimatedObject } from '@/src/intro/particles/particles.interface';
import { GradationBall } from '@/src/intro/particles/GradationBall';

/**
 * @description IntroApp class
 */
class IntroApp {
  canvas: HTMLCanvasElement;
  ctx: CanvasRenderingContext2D;
  stageWidth: number;
  stageHeight: number;
  pixelRatio: number;
  animatedObjects: AnimatedObject[] = [];

  constructor(animatedObjects: AnimatedObject[] = []) {
    //init
    this.canvas = document.createElement('canvas');
    document.body.appendChild(this.canvas);
    this.ctx = this.canvas.getContext('2d')!;
    this.stageWidth = document.body.clientWidth;
    this.stageHeight = document.body.clientHeight;
    this.pixelRatio = window.devicePixelRatio > 1 ? 2 : 1;
    this.animatedObjects = animatedObjects;

    //resize 한번 호출
    this.resize();

    //event
    window.addEventListener('resize', this.resize.bind(this));
    window.requestAnimationFrame(this.animate.bind(this));
  }

  //화면 resize 시마다 호출되는 함수, canvas 재계산
  resize() {
    this.stageWidth = document.body.clientWidth;
    this.stageHeight = document.body.clientHeight;
    this.canvas.width = this.stageWidth * this.pixelRatio;
    this.canvas.height = this.stageHeight * this.pixelRatio;
    this.ctx.scale(this.pixelRatio, this.pixelRatio);

    //resize 되었으므로 object init 해줘야함
    this.animatedObjects.forEach((animatedObject) => {
      animatedObject.init(this.stageWidth, this.stageHeight);
    });
  }

  animate() {
    // this.ctx.clearRect(0, 0, this.stageWidth, this.stageHeight);
    this.ctx.fillStyle = 'rgba(0, 0, 0, 1)';
    this.ctx.fillRect(0, 0, this.stageWidth, this.stageHeight);

    //animate object draw
    this.animatedObjects.forEach((animatedObject) => {
      animatedObject.draw(this.ctx);
    });

    window.requestAnimationFrame(this.animate.bind(this));
  }
}

window.onload = () => {
  console.log('window onload');

  const snows = [];
  for (let i = 0; i < 40; i++) {
    snows.push(new Snow(0, 0));
  }

  new IntroApp([...snows]);
};
재밌넹 ㅋㅋ
다음편은 유성이다!
https://kunkunwoo.tistory.com/296
html canvas + ts 로 유성효과 만들기 (canvas animation - 2편)
이번에는 눈효과에 이어 유성효과이다. 유성효과는 https://kunkunwoo.tistory.com/295 html canvas + ts로 눈효과 만들기 예전에 재밌게 했던 html canvas와 바닐라 js 를 이용해 효과들을 만든 기억이 떠올라 다
kunkunwoo.tistory.com
이 글을 읽고 만약에 canvas animation에 관심이 많이 생긴다면, 이 유튜버를 보면 많은 도움이 될것이다.
(필자도 처음 개발시작할때 이 유튜버의 영상을 보고 프론트 개발에 관심을 가지게 되었다! 실무에 쓸일은.. 많이없지만, 그래도 재밌으니까ㅎㅎ)
https://www.youtube.com/@cmiscm/videos
Interactive Developer
코드로 만드는 애니메이션, 영감, 실리콘밸리의 생활과 해외취업에 대해 이야기 합니다. https://blog.cmiscm.com/
www.youtube.com
'web' 카테고리의 다른 글
| cra 환경에서 배포환경에 따라 .env 나누기 & 동작에 대해 톺아보기(with: env-cmd) (0) | 2023.03.13 |
|---|---|
| html canvas + ts 로 유성효과 만들기 (canvas animation - 2편) (0) | 2023.03.11 |
| git 실무시 자주쓰는 명령어 모음 (0) | 2023.03.11 |
| vite 에서 mpa 사용시 dev 서버 세팅 (0) | 2023.03.10 |
| apple silicon이 들어간 컴퓨터 이용시, node-sass 에러해결 방법 (1) | 2023.02.22 |


